Your cart is empty
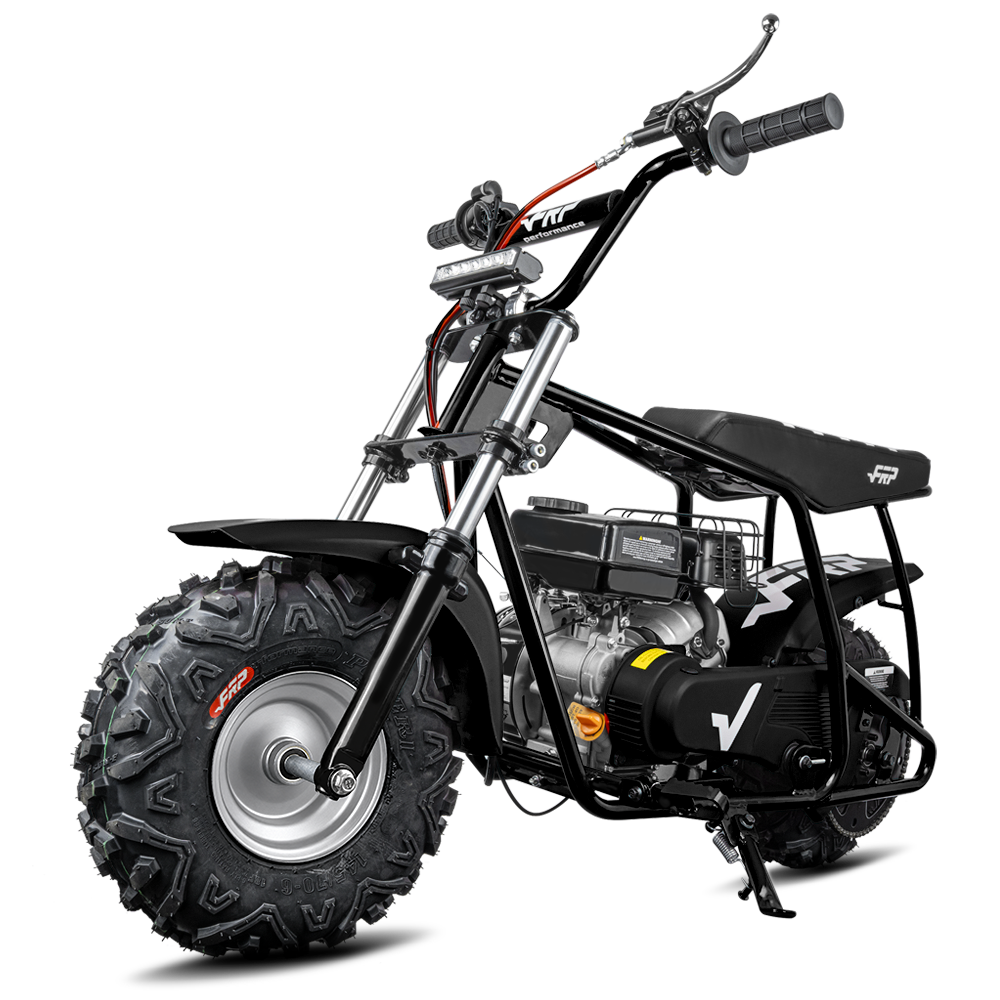
return to shopRead the safety section before the first ride. Every rider must read the owner's manual, and the manual stays with the bike if it changes hands. The full printed manual is available as a PDF.
Download the PDF manualGMB100 product page
GMB100 quick facts
These figures come from the technical specification page of the GMB100 manual.
| Item | Manual value |
|---|---|
| Engine | 99cc 4-stroke, EPA approved |
| Fuel | Unleaded 87 octane gasoline |
| Starting | Hand pull start |
| Brake | Rear disc brake |
| Drive | Chain |
| Tire | 145/70-6 pneumatic |
| Recommended cold tire pressure | 10 psi (max tire pressure listed as 100 kPa) |
| Max load | 220 lb |
| Net weight | 79.36 lb |
| Fuel capacity | 1.38 L |
| Engine oil capacity | 0.35 L |
| Recommended engine oil | SAE 15W-40 for most climates |
| Length x width x height | 50 in x 28 in x 33 in |
| Steering bar angle | 45 degrees |
| Max speed | 28 mph |
| Minimum rider age | 13 (manual: never allow children under 13 to ride) |
| Assembly time | About 20 minutes for an adult |
More detail: GMB100 specifications and GMB100 dimensions.
What is in the box and what you need
The GMB100 arrives about 85 percent assembled. Remove the foam separators that protect parts in transit, then check for paint scratches, dents or bent cables. Minor blemishes or dents on the carton itself are not a concern, according to the manual.
The loose parts to find in the box, listed left to right in the manual, are the steering pivot, the handlebar presses, the front fender and the front tire. The box also holds the oil bottle used for the first fill. Confirm every part is present before you start.
Tools named in the manual
- 12 mm and 15 mm wrenches (front fork bearings)
- 14 mm and 19 mm wrenches (front wheel nut)
- Pliers, a wrench and a secondary container (fuel system cleaning)
- Tire pressure gauge and a hand or electric pump
- Motor oil (10W30 for the clutch), chain lubricating oil, a clean cloth
Before any work: make sure the kill switch is in the OFF position before performing any maintenance or assembly procedure.
How to assemble the GMB100
Assembly has four parts: front fork, handlebar, front wheel and front fender. Follow them in this order. Watch the GMB100 unboxing and assembly video alongside the steps.
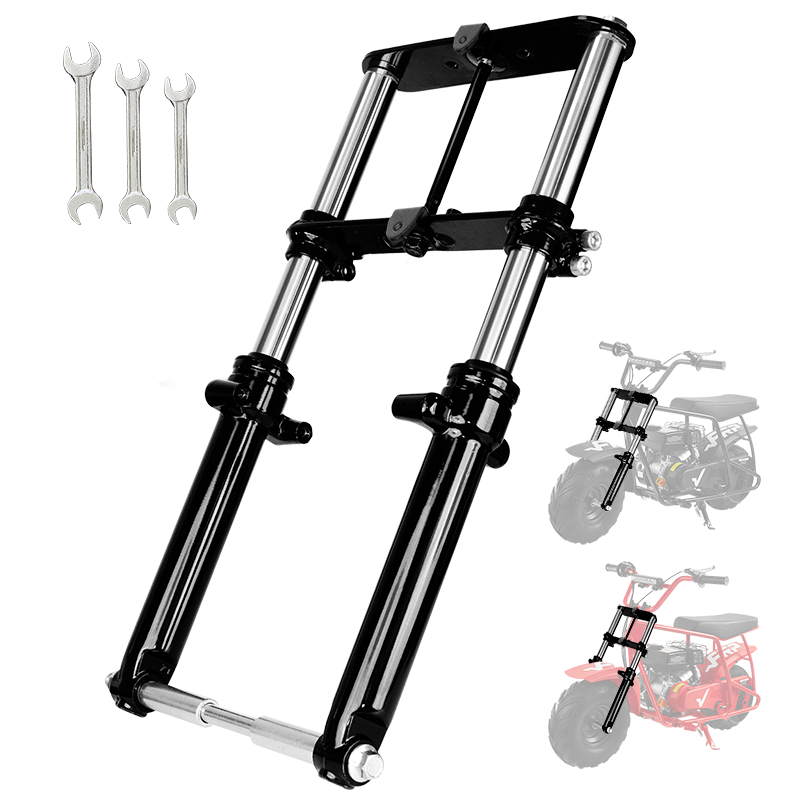
Step 1: Install the front fork
- Align the concave side of the front fork with the frame.
- Thread the handlebar out from the front fork and set it aside.
- Thread the handlebar from the left side of the front fork and head tube, or from the right side of the frame.
- Loosen the screws on the bearings, then insert the bearings into the connection between the front fork and the head tube.
- Tighten the screws and secure them with 12 mm and 15 mm wrenches.
Video: How to Assemble the Front Fork of GMB100. If your bike has the universal suspension fork, see How to Assemble the Universal Suspension Fork.
Step 2: Install the handlebar
- Place the handlebars in the handlebar clamps.
- Align the handlebars parallel to the fork and tighten the bolts. When properly tightened, the handlebars should not move forward or back.
Step 3: Install the front wheel
- Place the vehicle upright with the front fork about 20 cm off the ground.
- Loosen the screws on the bearings and thread the bearings in turn through the front fork, spacer and tire.
- Make sure the tire tread has its pointed edges facing forward.
- Thread the bearings from the left side of the frame to the right side.
- Place the other spacer on the opposite side of the tire and thread the bearing through it.
- Thread the nut onto the end and secure it with 14 mm and 19 mm wrenches.
- Verify that the front wheel is installed properly, rotates freely and shows no looseness or instability.
Step 4: Install the front fender
- Align the bracket of the front fender with the front forks.
- Secure the bracket to the front forks using the appropriate screws.
- Make sure the fender is securely and stably attached, without looseness.
- Check the clearance between the fender and the front wheel so the tire cannot rub or touch the fender.
Check the work: confirm the wheel spins freely and the fender is tight before the first start. Then work through the pre-ride checklist below.
Other assembly videos: Unboxing, Assembling, and Maintenance Guide (19:33) and, for the GMB100P, GMB100P Unboxing and Assembly Guide.
Pre-ride checklist
Before turning on and riding the mini bike, the manual says to check the following. Do not ride if the bike is not in proper operating condition.
- Tires: proper inflation and no excessive wear.
- Visually inspect the entire bike for damage.
- Check the engine oil level and the fuel level. Make sure the fuel cap and the oil filler cap are tight.
- Test that the brake and the throttle work properly.
- Look for fuel or oil leaks.
- Inspect all nuts and bolts for proper tightness.
- Make sure the handlebars turn smoothly.
- Complete any maintenance needed to bring the bike into proper riding condition.
Also oil the centrifugal clutch bushing before and after each ride (see the clutch section below).
How to start and stop the GMB100
The GMB100 uses a choke lever and a pull starter. The parts diagram in the manual labels the choke lever with the left position as RUN and the right position as START. Fill the engine with oil and the tank with fuel first.
First fill and start
- Locate the oil fill cap beneath the engine, unscrew it and remove the warning strip.
- Pour oil into the engine from the oil bottle supplied in the package.
- Screw the fill cap back in, then unscrew it again and check the markings on the cap.
- Make sure the oil level is above the minimum mark. If it is below the minimum mark, add oil.
- Unscrew the gas tank cap, add gasoline and screw the cap back on.
- Move the choke lever to the CHOKE position.
- Pull the pull start.
- Wait until the engine runs.
- Move the choke lever to the RUN position.
Warning: you must push the choke lever to the RUN position after the engine starts. With the lever left on CHOKE, no air reaches the carburetor and the bike cannot run.
Clutch oil: the manual asks you to oil the centrifugal clutch before and after each ride.
Video: How to Start FRP GMB100 Mini Bike.
Riding and stopping
- Twist the throttle toward you to increase speed. Releasing it lets the bike slow gradually to a stop.
- To slow or stop, release the throttle and squeeze the rear brake lever firmly and smoothly. Put a foot down when you stop.
- When finished, lower the kickstand with your foot and turn the engine kill switch to OFF. Pressing the large red button on the kill switch stops the engine immediately, even while riding.
Storage
Store the bike on a flat surface, preferably sheltered. Storing it in sun, wind, rain or snow can shorten its life.
Fuel and engine oil requirements
Use unleaded gasoline rated 87 octane or higher. Never use ethanol-blended fuel, stale or contaminated fuel, or fuel mixed with oil. Use SAE 15W-40 engine oil in most climates; in extreme climates check an SAE oil viscosity chart. The engine oil tank holds 0.35 L.
Adding fuel
- Park on a firm, level surface and turn the kill switch to OFF.
- Unscrew the fuel cap.
- Add fuel. The tank is full when the level reaches the bottom of the fuel filler neck.
- Screw the cap back on and tighten it securely.
- Wipe away any spilled fuel with a cloth.
Checking and adding engine oil
Check the oil level before every ride.
- Park on a firm, level surface, kill switch OFF.
- Wipe the area on and around the oil filler cap, then remove the cap.
- Wipe the dipstick clean.
- Hold the bike upright, not resting on the kickstand.
- Insert the cap into the filler hole until it rests, then screw it in.
- Remove the cap and read the dipstick. If the oil is at or near the upper mark, do not add oil. If it is at or near the lower mark, add oil.
- Pour oil into the filler hole and repeat the check until the level is correct. Do not overfill.
- Screw the cap in tightly, run the bike for several minutes, stop it and check the level again.
- Start the bike and check for leaks. If oil leaks, tighten the oil filler cap and the oil drain bolt.
Changing the engine oil
- Park on a firm, level surface.
- Run the bike for five to ten minutes to warm the oil, then turn the kill switch to OFF.
- Place an oil drain pan under the oil drain bolt.
- Unscrew the oil drain bolt with a wrench and let the oil drain.
- Lift the bike from the rear frame so all the oil drains from the engine.
- Screw the drain bolt in firmly. Do not overtighten.
- Refill to the proper level. The oil tank capacity is 0.35 L.
- Dispose of waste oil at a government-certified drop-off location.
GMB100 maintenance schedule
The manual gives service intervals by odometer distance in kilometers. Codes: I = inspect (including check, clean, lubricate, refuel, repair or replace if necessary), A = adjust, C = clean, R = replace, L = lubricate. Blank cells mean no action is listed.
| Item | 750 km | 2000 km | 3000 km | 6000 km | 9000 km | 12000 km | 15000 km | Every ride |
|---|---|---|---|---|---|---|---|---|
| Engine oil | R | R | R | R | R | R | R | I |
| Valve gap | I/A | I/A | I/A | I/A | I/A | |||
| Idle speed | I/A | I/A | I/A | I/A | I/A | |||
| Engine bolts | I | I | I | I | I | |||
| Air cleaner | I | I | R | I | R | I | I | |
| Drive chain | I/L | I/L | I/L | I/L | I/L | |||
| Fuel line | I | I | I | I | I | |||
| Brake system | I | I | I | I | I | I | ||
| Nuts, bolts, fasteners | I | I | I | I | I | I | ||
| Wheels and tires | I | I | I | I | I | I |
The first engine oil replacement is listed at 750 km. Separately, the manual asks you to oil the clutch bushing before and after each ride and to lubricate the chain routinely, described below.
Maintenance how-tos from the manual
Lubricate the clutch bushing
Oil the clutch bushing before and after each ride. Skipping this can damage the clutch and bushing and may make the bike creep forward at idle or stall at idle.
- Remove the rubber plug from the clutch cover.
- Drip several drops of 10W30 motor oil on the clutch hub behind the silver washer, on top of and behind the circlip.
- Let the oil seep into the bushing for several minutes before starting the bike.
- Replace the rubber cap.
Lubricate more often if you idle for long periods, ride under heavy load, ride with the brake partly applied, or ride for long stretches at partial throttle. These conditions create heat that burns off the lubrication.
Adjust the drive chain
The chain needs a small amount of slack. Too little or too much can damage the bike. Target vertical movement is about 1/2 inch.
- Park on a firm, level surface, kill switch OFF.
- Reach over the top of the chain guard and pull up on the chain midway between the sprockets. Movement should be about 1/2 inch.
- Repeat at several points on the chain. The slack should stay constant. If it does not, adjust.
- Loosen both the axle nut and the chain tensioner adjustment nut.
- Slide the axle forward to loosen the chain or backward to tighten it until slack is about 1/2 inch.
- Tighten the axle nut and the tensioner adjustment nut.
- If the tensioner is as tight as possible and slack remains, the chain is worn past its service limit. Contact customer service or a service center.
Lubricate the drive chain
- Park on a firm, level surface, kill switch OFF.
- Apply chain lubricating oil or any lightweight lubricating oil to the chain visible on the rear sprocket, then wipe off excess with a rag.
- Rotate the rear tire to bring a new length of chain into view and repeat.
- Continue until the entire chain is lubricated. Lubricate the chain after every cleaning and drying of the bike.
Adjust the rear disc brake
Adjust the brake if you cannot stop properly. Regular use loosens it over time.
- Park on a firm, level surface, kill switch OFF.
- Loosen the adjusting nut with a wrench.
- Pivot the brake mechanism toward the front of the bike until there is a very small amount of tension on the pivot arm. Do not rotate it as far forward as it can go, because the brake would stay engaged.
- Tighten the adjusting nut.
- Lift the back of the bike without applying the brake and spin the rear wheel. It must spin freely. If not, repeat steps 1 to 4 without rotating the mechanism as far forward.
- Lower the bike and apply the brake lever. Try to roll it forward without starting it. If the rear wheel does not rotate, the brake is adjusted. If it still turns even slightly, repeat steps 1 to 5, rotating the mechanism further toward the front.
Video: How to Adjust Rear Wheel Brake Caliper for FRP GMB100.
Clean the air filter
- Park on a firm, level surface, kill switch OFF.
- Press firmly on the tab that secures the air filter cover with a hard metal object such as a key or tool end. The cover pops off and exposes the sponge-like filter.
- Remove the filter from its housing.
- Wearing gloves and eye protection, dampen the filter with air filter cleaner or a non-flammable solvent.
- Squeeze out the excess cleaner without damaging the filter, then let it dry completely.
- Dampen the filter with quality air filter oil and squeeze out the excess.
- Reinstall the filter and cover.
Tires: inspect and inflate
Inflate both tires to 10 psi cold. Check pressure with a gauge when the tires are cold, since warm tires read artificially high. Never check or add air while the engine is running.
Inspect tires with the kill switch OFF. Look for bumps or bulges in the sidewall and inside the tread, cuts, slits, cracks, excessive wear, and embedded rocks, screws or nails. Replace a tire if fabric or cord is showing or if it has bumps or bulges, or when traction drops. Never ride with a bent or dented rim; take the bike to a service center.
Cleaning
Wash with water, mild neutral detergent or mild spray cleaner, using a garden hose and soft sponge. Avoid high-pressure washers, harsh brushes, harsh detergents and solvents. Never aim water directly at the engine and never wash the bike while the engine is running.
Common GMB100 problems and fixes
Turn the kill switch to OFF and park on a firm, level surface before working on any of these.
| Problem | Likely cause | What the manual says to do |
|---|---|---|
| Engine will not start after repeated pulls | Flooded with excess fuel | Push the choke lever to RUN, hold the throttle open, and pull the starter cord in rapid succession for about 30 seconds. Then turn the kill switch to ON and start with the choke at RUN. |
| Bike starts then will not run | Choke still on CHOKE | Move the choke lever to RUN after the engine starts. Left is RUN and right is START on the diagram. |
| Will not start or runs poorly | Clogged fuel cap vent | Remove the fuel cap to let air in, refit it and try again. If it now starts, clean dirt and debris from the fuel cap vent. |
| No fuel flow, dirt or water in fuel | Contaminated fuel system or clogged filter | Drain the tank into a secondary container, remove and clean the fuel filter, flush with fresh fuel until no debris remains, and if sediment was found, clean the carburetor sediment cup. Check for leaks after restarting. |
| Cannot stop properly | Rear disc brake out of adjustment | Adjust the brake as described above. |
| Bike creeps forward at idle or stalls at idle | Clutch bushing not lubricated | Oil the clutch bushing with 10W30 motor oil and repeat more often under heavy use. |
| Chain has too much or no slack | Chain stretched or over-tightened | Adjust to about 1/2 inch of slack. If slack remains with the tensioner fully tightened, the chain is worn out; contact customer service. |
| Oil leaking | Loose filler cap or drain bolt | Tighten the oil filler cap and the oil drain bolt. |
| Handlebars move forward or back | Loose clamp bolts | Tighten the handlebar clamp bolts. Handlebars should not move forward or back. |
Stop riding: if the bike is not running correctly, stop immediately and do not ride it back to your base. If a fix does not work, contact support below.
Safety, gear and legal
The GMB100 is an off-road mini bike for one rider at a time, on dirt, gravel or similar surfaces. The manual lists these rules.
- Never let children under 13 ride. Minors must ride under adult supervision, and a guardian must confirm the rider is physically and developmentally ready.
- Wear a DOT-approved full-face motorcycle helmet with chin strap, goggles, boots, gloves, long riding pants with hip and knee pads, and a long-sleeved jersey with elbow, chest and shoulder pads. Keep hair tightly secured.
- No passengers. Max load is 220 lb.
- Do not ride on hard surfaces such as concrete or asphalt. The tires are not stable on them and wear faster.
- Do not ride alone. Stay near your base and other people.
- Never ride under the influence of alcohol or drugs.
- Ride within your skill level. Keep both hands and feet on the handlebars and pegs. Do not brake or accelerate while turning. No tricks, stunts, jumps or wheelies. Take extra care in mud or wet conditions.
- Never run the engine in an enclosed or poorly ventilated space. Exhaust contains carbon monoxide.
- Do not modify the bike or add aftermarket accessories. The manual states that carburetor and exhaust modifications violate the law.
- Service with the kill switch OFF and the engine stopped. Keep flames and cigarettes away from gasoline and oil.
Laws
The manual states it is illegal to operate this off-road vehicle on public streets, roads and highways, and illegal to operate under the influence of drugs or alcohol even on private property. You may need to title or register the bike; keep the Certificate of Origin. Dispose of gasoline and oil according to local law. Laws vary by location, and the rider is responsible for compliance.
California Prop 65: operating, servicing and maintaining an off-highway motor vehicle can expose you to chemicals including engine exhaust, carbon monoxide, phthalates and lead, which the State of California lists as causing cancer and birth defects or other reproductive harm. Avoid breathing exhaust, do not idle needlessly, service in a well-ventilated area, and wear gloves or wash your hands often.
GMB100 repair and replacement videos
FRP Moto publishes short step-by-step videos for GMB100 assembly and for replacing individual parts. Replacement parts are in the GMB100 parts collection and the wider FRP parts collection.
Unboxing, assembly and start-up
- FRP GMB100 Mini Bike Unboxing and Assembly Guide
- FRP GMB100 Mini Bike Unboxing, Assembling, and Maintenance Guide
- FRP GMB100P Mini Bike Unboxing and Assembly Guide
- How to Assemble the Front Fork of GMB100
- How to Assemble the Universal Suspension Fork
- How to Start FRP GMB100 Mini Bike
Brakes
- How to Replace Brake Pads on GMB100 Mini Bike: A Step-by-Step Tutorial
- How to Replace Brake Caliper for FRP GMB100 Mini Bike
- How to Replace Brake Line for FRP GMB100 Mini Bike
- How to Adjust Rear Wheel Brake Caliper for FRP GMB100
Tires
- How to Replace Front Tire for FRP GMB100 Mini Bike
- How to Replace Back Tire for FRP GMB100 Mini Bike
Chain and drive
- How to Replace Chain for FRP GMB100 Mini Bike
- How to Replace Chain Sprocket for FRP GMB100 Mini Bike
- How to Replace Clutch for FRP GMB100 Mini Bike
- How to Replace Front Chain Cover for FRP GMB100 Mini Bike
- How to Replace Back Chain Cover for FRP GMB100 Mini Bike
Engine and fuel
- How to Replace Spark Plug for FRP GMB100 Mini Bike
- How to Replace Pull Start for FRP GMB100 Mini Bike
- How to Replace the Carburetor for Your FRP GMB100 Mini Bike
- How to Replace Impeller for FRP GMB100
- FRP GMB100 Mini Bike Gasoline Draining Guide
- FRP GMB100 Mini Bike Oil Change Guide: How to Drain Oil Safely
Controls and electrical
- How to Replace Throttle for FRP GMB100 Mini Bike
- How to Replace Throttle Cable for FRP GMB100 Mini Bike
- FRP GMB100 Mini Bike Throttle Lever Repair Guide
- How to Replace Kill Switch for FRP GMB100 Mini Bike
- How to Replace Head Light for FRP GMB100 Mini Bike
Body
Where to go next and how to reach support
For a problem this page does not solve, stop riding and contact FRP Moto support: csr@frpmoto.com or 833-970-3777 (toll free), Monday to Friday, 8am to 5pm PST. Keep your order number and the bike's serial number or purchase month and year at hand.