Published: June 2, 2026
TL;DR
Mounting a 212cc engine on an FRP GMB100 mini bike starts with the right frame. The GMB100 upgraded frame has 212-compatible engine mounting points built in, which makes it the correct starting platform for this build. Beyond the engine, a proper 212 mount also requires a torque converter or clutch, a 420 chain and sprocket kit, a fuel tank with sufficient capacity, and an upgraded brake system. The FRP Moto upgraded parts collection includes all five of these components. The engine itself is only the first purchase — plan the full parts list before you start.
Direct Answer
The first step to mounting a 212cc engine on a GMB100 is using the right frame — the FRP GMB100 upgraded frame, which has engine mounting points designed for 212cc engines. Once you have the correct frame, the mounting process involves securing the engine block, connecting the drivetrain, routing the fuel line, adjusting the throttle cable, and upgrading the brake system to match the increased power.
This is not a single-part purchase. A 212 engine swap on a GMB100 involves five major components beyond the engine itself: the frame, torque converter or clutch, 420 chain and sprocket kit, cylindrical gas tank, and hydraulic brakes. Buying just the engine and attempting to mount it on a stock setup will result in fitment issues, chain alignment problems, fuel limitations, and brake inadequacy.
The sections below explain what each part does, why it is needed, and how the build comes together.

Why This Question Comes Up
Most riders who ask how to mount a 212 engine on a GMB100 have already made the decision to do the swap. The research phase is behind them. What they need now is a clear parts list and a realistic sense of what the process involves.
The challenge is that most online build threads are fragmented — one post covers the engine, another covers the chain setup, another covers brakes. It is easy to end up with an incomplete picture and end up ordering parts that do not work together or forgetting a critical component until mid-build.
This article is designed to give you the full picture in one place: what parts you need, why each one matters, and how to approach the build in the right order.
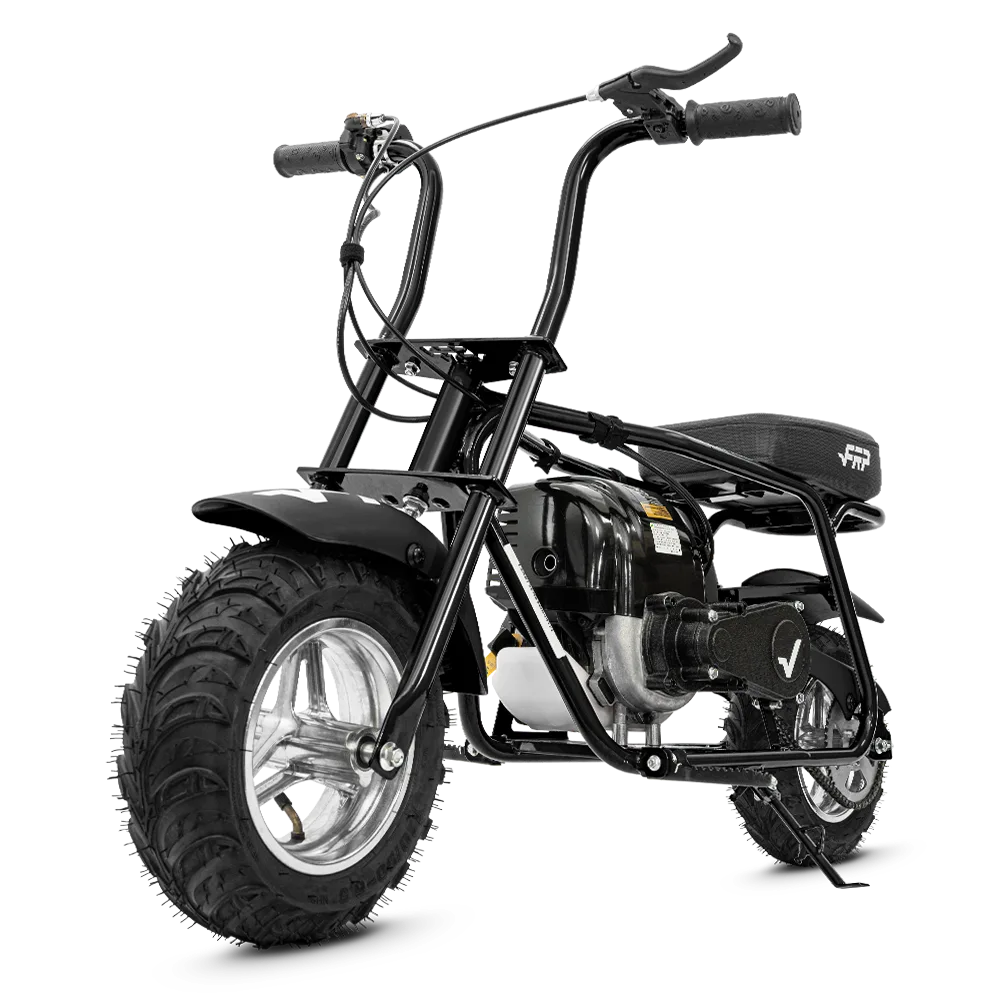
Why the GMB100 Upgraded Frame Is the Right Starting Point
Not all mini bike frames are designed for a 212cc engine. A stock frame built around a 99cc engine has different mounting geometry, different weight distribution planning, and a different chain line than a frame designed for the larger engine block.
The FRP GMB100 upgraded frame solves this at the foundation level. The frame has engine mounting points that accommodate a 212cc engine, which means you are not improvising the fit or relying on fabricated spacers. The engine sits where it is supposed to sit, the chain line can be properly aligned, and the drivetrain geometry works as designed.
If you are starting a 212 build from scratch, the upgraded frame is the purchase to make before the engine. If you already have a GMB100, the upgraded frame is a direct platform upgrade that sets up the rest of the build correctly.
The 5 Parts a 212 Engine Mount Requires
Here is the full parts list for a 212 engine mount on a GMB100. These are in addition to the engine itself.
| Part | Why It Is Needed | FRP Option | Price |
|---|---|---|---|
| GMB100 Upgraded Frame | 212-compatible engine mounting points; correct build base | GMB100 Upgraded Frame | See product page |
| Torque Converter | Smooth power delivery from 212 engine; automatic ratio adjustment | FRP x ParkerPro Torque Converter | $59.99 |
| 420 Chain, Clutch & Sprocket Kit | Correct chain spec for 212 torque output; matched sprocket set | FRP x ParkerPro 420 Chain, Clutch & Sprocket Kit | $72.99 |
| Cylindrical Gas Tank | More fuel capacity for 212 engine; fits 212 build frame geometry | FRP x ParkerPro Mini Bike Gas Tank | $69.99 |
| Hydraulic Brake Kit | Required stopping power for 212 speed output; drum brakes are insufficient | Mini Bike Hydraulic Brakes Kit | $32.99 |
Total for the five supporting parts: approximately $235 before the engine. Plan the full parts list before purchasing to avoid mid-build surprises.
What Each Part Does in the Build
The Torque Converter
A 212cc engine produces significantly more torque than a 99cc engine. That torque needs to be delivered to the rear wheel in a way the rider can control, especially from a standing start. A torque converter handles this automatically — it adjusts the drive ratio as engine RPM changes, which makes starts smooth and reduces engine stall at low speeds.
For most riders, especially those new to bigger engine builds, the torque converter is the right drivetrain choice. A direct-drive clutch is simpler but requires more precise throttle control to avoid lurching starts and stalling. The FRP x ParkerPro Torque Converter at $59.99 is designed for this application.
→ Read more: Do I Need a Torque Converter for a 212 Mini Bike Build?
The 420 Chain, Clutch and Sprocket Kit
The chain specification matters. A 212cc engine generates more torque than a 99cc engine, and the chain and sprocket set needs to be matched to that output. The 420 chain specification is the standard for mini bike 212 builds. Using an undersized chain risks premature wear, skipping, or chain failure under load.
The kit includes the chain, clutch, and a matched sprocket set, which means you are not sourcing these individually and hoping the specs align. Buying them as a kit eliminates compatibility guesswork.
The Cylindrical Gas Tank
The stock gas tank on many mini bikes is sized for a 99cc engine's fuel consumption. A 212cc engine uses more fuel and produces more heat. A cylindrical gas tank with greater capacity reduces refueling frequency and fits the geometry of the upgraded frame more cleanly than a repurposed stock tank.
At $69.99, the FRP x ParkerPro cylindrical gas tank is purpose-matched to this type of build. Improvising the fuel setup — using a tank that does not fit properly or has insufficient capacity — is a common source of mid-ride problems on 212 builds.
The Hydraulic Brake Kit
This is not optional. A 212cc engine can push a mini bike to speeds where stock drum brakes are not adequate. Drum brakes can heat up under sustained use, lose modulation, and produce longer stopping distances than a rider expects coming from a 99cc setup.
Hydraulic brakes provide better stopping power, better feel, and better performance under heat compared to drum brakes. The FRP Moto hydraulic brake kit at $32.99 is the appropriate upgrade for any 212 build. Do not skip this part.
→ Read more: Does a 212 Swap Require Better Brakes on a Mini Bike?
Mounting Overview: What the Process Looks Like
This is not a step-by-step repair manual — every build has variations depending on the specific engine, hardware, and frame condition. But here is a realistic overview of what the mounting process involves so you can plan your time and tools appropriately.
- Start with the frame. Confirm the upgraded frame is in place and all existing hardware is accounted for. A 212 build on a frame not designed for it creates alignment problems from the start.
- Position the engine block. Align the engine to the mounting points on the frame. A 212cc engine is heavier than a 99cc engine, so this step takes more care than a lighter engine swap would.
- Secure the engine mount hardware. Most 212cc engines come with mounting hardware, but confirm bolt size and thread pitch match the frame's mounting points before tightening.
- Install the torque converter or clutch. Mount to the engine output shaft. Follow the torque converter manufacturer's installation instructions for key, setscrew, and belt alignment.
- Install the rear sprocket and set the chain. Use the 420 sprocket and chain from the kit. Chain tension is important — too tight causes wear, too loose causes skipping.
- Route the fuel line from the cylindrical tank. Position the tank, route the fuel line to the carb, and confirm there are no kinks or pinch points that would restrict fuel flow.
- Connect and adjust the throttle cable. Confirm full range of motion with no binding, and that the throttle returns to idle when released. This is a critical safety check.
- Install hydraulic brakes. Mount the caliper, route the brake line, bleed the system if required, and confirm brake lever response before any test ride.
- Check the exhaust. A 212 engine requires a 212-spec exhaust, not a 99cc muffler. Confirm fitment and check for leaks.
- First test in a controlled area only. Low speed, private property, with a helmet and full protective gear. Check for chain noise, brake response, throttle behavior, and fuel flow before going further.
Where 212 Builds Go Wrong
The most common mistakes on 212 engine mounts are predictable and avoidable.
| Mistake | What Happens | How to Avoid It |
|---|---|---|
| Using the wrong chain spec | Chain wears fast, skips, or fails under load | Use a 420-spec chain and sprocket kit matched to the engine |
| Skipping the brake upgrade | Drum brakes overheat or cannot stop the bike at 212 speeds | Install hydraulic brakes before any test ride |
| Reusing the stock gas tank | Insufficient fuel capacity, fuel line routing issues, refueling mid-ride | Use a cylindrical tank designed for this build geometry |
| Poor throttle cable routing | Throttle sticks open, does not return to idle, unpredictable acceleration | Route cable with no sharp bends, confirm return spring before riding |
| Wrong frame base | Engine does not sit correctly, chain line is off, frame stress at wrong points | Start with the GMB100 upgraded frame, not a stock 99cc frame |
| Skipping the exhaust upgrade | 99cc exhaust does not match 212 engine port; back pressure, heat issues | Use a 212-spec exhaust header and muffler |
FRP Moto Notes for a 212 Build
If you are building around a GMB100 platform, the FRP Moto upgraded parts collection has the five supporting components listed in this article. Using FRP Moto parts means the specs are matched for the GMB100 geometry — you are not guessing whether a third-party part fits the frame or aligns with the drivetrain.
The upgraded frame is the starting point. From there, the torque converter, chain kit, gas tank, and hydraulic brakes can be added in order as your build progresses.
If you are unsure about any part of the build, contact FRP Moto support before purchasing. A build that starts with the wrong parts costs more to fix than to plan correctly from the beginning.
Safety: What Changes When You Go to 212
A 212cc engine is approximately twice the displacement of a 99cc engine, and the power increase is significant. This is not a modification that makes a mini bike slightly faster. It changes how the bike accelerates, how quickly it reaches speed, how much braking force is needed to stop it, and how much rider skill is required to control it safely.
Before any test ride on a 212 build:
- Confirm the throttle cable moves freely and returns to idle with no sticking.
- Confirm brakes are installed and tested — not just the drum, but hydraulic brakes.
- Confirm the chain is properly tensioned and the sprocket is secured.
- Confirm the fuel line has no kinks and the carb is properly seated.
- Wear a helmet and full protective gear — not optional for a 212 build.
- Test only on private property or a controlled off-road area. Mini bikes are not street legal.
- Start at low speed in a clear area before increasing throttle input.
- Stop immediately if the throttle feels sticky, the chain makes unusual noise, or the bike behaves unpredictably.
More power means more responsibility for the build quality and the rider's decisions. Take the safety steps as seriously as the performance steps.
FAQ
Does the FRP GMB100 upgraded frame support a 212 engine?
Yes. The FRP GMB100 upgraded frame has engine mounting points designed for 212cc engines. It is the recommended frame base for any 212 engine swap on a GMB100 platform.
What bolts and hardware do I need to mount a 212 engine?
Most 212cc engines come with mounting hardware. Confirm the bolt size and thread pitch match your frame's mounting points before assembly. The GMB100 upgraded frame uses standard mini bike engine mount dimensions.
Do I need a torque converter or a clutch for a 212 build?
A torque converter is recommended for most builds, especially for beginners. It provides smoother starts and better low-end pull compared to a direct-drive clutch. A clutch is simpler but requires more precise throttle control. The FRP x ParkerPro Torque Converter ($59.99) is the recommended option for GMB100 212 builds.
What chain should I use with a 212 engine on a mini bike?
Use a 420-spec chain. The 420 chain specification is standard for mini bike 212 builds. The FRP x ParkerPro 420 Chain, Clutch and Sprocket Kit ($72.99) includes the chain, clutch, and matched sprocket set.
Does a 212 swap require a new gas tank?
Yes, in most cases. A 212cc engine uses more fuel than a 99cc engine and produces more heat. A cylindrical gas tank with greater capacity is recommended for proper fuel supply and to fit the geometry of the upgraded frame. The FRP x ParkerPro Mini Bike Gas Tank ($69.99) is purpose-matched to this build type.
How do I align the chain and sprocket on a 212 mini bike?
Chain and sprocket alignment requires the rear axle sprocket and the engine output sprocket to be in the same vertical plane. After mounting the engine, use a straightedge to check alignment before tensioning the chain. Misalignment causes accelerated wear and can cause the chain to skip or derail under load.
Do I need to upgrade the brakes when I put a 212 engine in a mini bike?
Yes. A 212cc engine produces speeds where stock drum brakes are not adequate. Hydraulic brakes provide better stopping power and more consistent feel. The FRP Moto Hydraulic Brake Kit ($32.99) is the recommended upgrade for any 212 build.
Can a beginner do a 212 engine swap on a GMB100?
A mechanically experienced adult can complete a 212 engine swap with the right parts and tools. It is not a beginner-level maintenance task. If you are new to engine work, having someone with build experience assist or review the installation before the first test ride is strongly recommended.
What is the total cost of mounting a 212 engine on a GMB100?
The five supporting parts total approximately $235 (torque converter $59.99, chain kit $72.99, gas tank $69.99, hydraulic brakes $32.99, upgraded frame at listed price). The engine itself is an additional cost. A complete 212 build on a GMB100 platform typically runs $400 to $600 in parts depending on engine choice and hardware.
Does a 212 engine swap void the GMB100 warranty?
Engine swaps and modifications go beyond the original product configuration. Contact FRP Moto support directly for questions about warranty coverage on modified builds before proceeding.
What to Read Next
- Is a 212 Swap Cheaper Than Modding the Stock FRP GMB100 Motor?
- Does a 212 Swap Require Better Brakes on a Mini Bike?
- Do I Need a Torque Converter for a 212 Mini Bike Build?
- Will a 212 Exhaust Fit a 99cc Mini Bike?
- How Fast Does a 212cc Mini Bike Go?
- FRP Moto Answers Hub
Not ready to build just yet? The FRP Moto GMB100 complete mini bike ($379.99–$439.99) ships fully assembled — ride stock first, then plan your 212 upgrade from a bike you already know.
Predator 212 Non-Hemi Gas Tank Bolt and Fitment Note
One small 212 swap question that comes up often is whether the gas tank bolts from one Predator 212 will fit another version, especially when comparing Hemi and non-Hemi engines. Do not force a tank bolt just because it came from another 212 engine.
Predator 212 variants and clone engines can use different tank brackets, thread locations, hardware, or clearance around the frame and header. If the bolt does not start by hand, stop. Forcing it can strip the threads, crack the bracket, or leave the tank mounted in a way that vibrates loose.
Before riding a 212-swapped GMB100, check these points:
- Confirm whether the engine is Hemi, non-Hemi, or another GX200-style clone.
- Confirm the tank bracket lines up without pulling the tank sideways.
- Start tank bolts by hand before tightening with a tool.
- Keep the fuel line away from the header, clutch, chain, and tire.
- Check tank clearance at full steering lock and after the first short test ride.
- If the stock-style tank does not clear safely, plan a compatible build tank through the FRP upgraded parts collection.
This is not a cosmetic detail. Fuel mounting, line routing, heat, and vibration are part of the swap. A 212 build should not be considered finished until the tank is secure and the throttle, chain, exhaust, and brake system have been checked together.
FAQ: Which gas tank bolt hole do I use on a non-Hemi Predator 212?
Use the tank mounting points that line up cleanly with your exact engine and bracket. If a bolt from another 212 tank does not thread in by hand, do not force it. Confirm the engine variant, bracket, and hardware before tightening anything.
FAQ: Can I reuse a gas tank from another 212 engine?
Sometimes, but do not assume universal fit. Check bracket alignment, thread engagement, frame clearance, fuel line routing, and heat path before using a tank from another engine.
Predator 224 on a GMB100: What Changes From a 212 Swap?
A Predator 224 swap belongs in the same build family as a Predator 212, but it should not be treated as a drop-in guess. The extra torque and small fit differences make the mount, tank, exhaust, torque converter, chain, and brake checks more important.
Before ordering parts, compare the whole setup:
- Mounting: confirm the engine bolt pattern, plate position, and chain alignment on the GMB100 mini bike frame.
- Torque converter clearance: a 224 build may need careful riser, backing plate, and cover clearance checks before final tightening.
- Exhaust: do not assume the 99cc or 212 exhaust path clears a 224. Check frame rail, seat, leg, and fuel-line heat clearance.
- Fuel tank: confirm tank bracket, bolt alignment, fuel-line routing, and heat path. Do not force a tank bolt that does not start by hand.
- Drivetrain: move toward a #420 chain setup for 212cc and 224cc builds when torque and riding load increase.
- Brakes: pair higher-power builds with a stopping check, especially if the bike will run faster or be used for hard launches.
FAQ: Can I put a Predator 224 on a GMB100?
Yes, a Predator 224-style build can be planned around the GMB100 frame path, but it needs the same checks as a serious 212 swap: mount position, chain alignment, exhaust clearance, tank routing, torque converter fit, and brake capacity.
FAQ: Do I need a riser for a Predator 224 torque converter?
Maybe. A torque converter riser depends on engine position, backing plate clearance, chain line, frame clearance, and cover fit. Test-fit before final assembly instead of assuming every 224 setup uses the same spacer or riser.
FAQ: Will the stock GMB100 exhaust fit a Predator 224?
Do not assume it will. A 224 engine can change header location and clearance. Check the frame, seat, leg area, fuel line, and tank before riding. A larger-engine exhaust should be chosen for safe routing, not only sound.